How To Make Your Own Iron-On Patches
Custom patches are an amazing way to breathe new life into your favorite clothes, whether you’ve got an old pair of jeans or a denim jacket that needs a fresh upgrade. Iron-on patches are one of the easiest ways to personalize your wardrobe and add your unique style with minimal effort.
In this guide, we’ll walk you through everything you need to know to create your own Custom Iron-on patches, so you can rock stylish, one-of-a-kind designs that reflect your personality.
What Do I Need To Make My Own Iron-On Patches?
To create your custom iron-on patches, you'll need just a few basic tools and materials. Here's what you'll need to get started:
- Iron
- Fabric for the patch
- Scissors or cutting machine
- Iron on adhesive
- Sewing machine
- Transfer sheets
- An iron
- Embroidery hoop
- Fabric pencil
- Embroidery needle
- Peel-and-stick fabric fuse
- Photo editing software
- A digital camera or phone camera
- Inkjet printer
Designing Your Artwork
When creating custom patches, the design is key! Are you making patches for your club, organization, or simply for fun fashion? Search for design inspiration like logos, letterheads, emojis, and emblems to get started.
If you’re not into hand-drawing your design, an inkjet printer will come in handy. Be sure to choose high-quality images with great resolution to ensure your custom patch looks crisp and clear.
If the idea of designing your own patch sounds overwhelming, don’t worry! At THE/STUDIO, we have a team of design experts who can help bring your vision to life. Simply upload your design, and we’ll create the perfect design and customize the iron-on patch for you, no stress required.
3 Ways To Make Your Own Iron-On Patches
Making your own iron-on patches is easier than you think, and you can choose the method that best suits your skills and available supplies. Whether you prefer hand-stitching or using a sewing machine, there’s an option for everyone. Just follow our guide, and you’ll be rocking your new custom patch in no time!
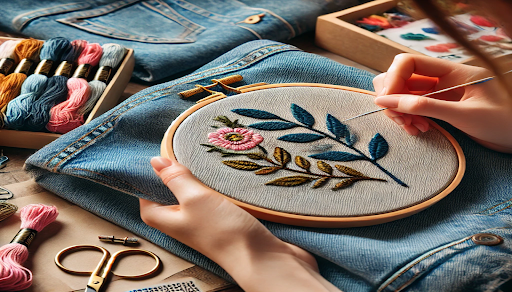
A. Hand Embroidering a Patch
Hand-embroidering a patch is a rewarding and authentic way to create your own custom iron-on patches. While it can be a bit challenging, the result is truly unique and personalized. Follow these simple steps to make your own embroidered patch:
- Choose Your Design: Start with a simple, clear design for your patch. Since you’ll be hand-stitching, it’s best to choose something that’s easy to manage and doesn’t have too much intricate detail.
- Pick Your Thread and Fabric: Select a thread color that contrasts well with your patch and is easy to see while stitching. For the fabric, choose something suitable for embroidery, such as denim or cotton, which hold stitches well.
- Trace Your Design: Using a transfer pen with a fine tip, trace your design onto moderate-weight cotton fabric. Make sure the lines are clean and visible for accurate stitching.
- Prepare Your Embroidery Hoop: Place your fabric inside an embroidery hoop. The outer hoop goes on top, while the inner hoop sits underneath the fabric. Tighten the screw to hold the fabric in place, ensuring it stays taut.
- Thread Your Needle: Thread your embroidery needle with embroidery floss and tie a double knot at the end to secure the thread.
- Start Stitching: Pick a starting point and begin stitching. Push the needle from the back to the front of the fabric, and then pull it through to the back again. Continue this process for the entire design, making sure the fabric stays smooth with the help of the embroidery hoop.
- Finish Embroidering: Once you’ve completed the stitching, loosen the embroidery hoop by unscrewing the outer hoop. Remove the hoop carefully.
- Cut the Patch to Shape: Use fabric scissors to trim the patch to your desired size and shape. Leave a small border around the edges to create a clean, polished look.
- Apply the Peel-and-Stick Backing: Place the finished patch onto the sticky side of a peel-and-stick sheet. Cut the sheet to match the size and shape of your patch.
- Iron the Patch Onto Your Garment: Finally, use an iron to activate the adhesive on the back of your patch, ensuring it securely attaches to your garment.
Now you’re ready to attach the patch to your garment. Use an iron to activate the backside adhesive.
B. Using a Sewing Machine
Using a sewing machine is an efficient way to create custom patches without the time and effort of hand-embroidering. With the right tools and techniques, you can easily sew your patches and add a personal touch to your garments. Here’s how to do it:
- Choose Your Design: Pick a patch design that suits your style. Consider using thick fabrics like denim, canvas, felt, twill, or upholstery fabric for a durable and high-quality result.
- Trace Your Design: Trace your chosen design onto the fabric. You can use fabric chalk or a fabric pen for easy-to-remove markings.
- Adjust Your Sewing Machine Settings: Set your sewing machine's stitch length to 0 or 2 for bold, thicker borders. This will help fill in the design faster. For tighter stitches, adjust to a smaller stitch length
- Use a Zigzag Stitch: Select a zigzag stitch setting (typically the 1-08 setting) and carefully follow the lines of your design. Start at one corner and pivot as needed to avoid tangling the thread.
- Sew the Patch: Press the foot pedal and guide the fabric gently to ensure even stitches. Hold the fabric in place with your hands as the sewing machine stitches around the design.
- Trim the Patch: Once you've finished sewing, cut off the excess fabric around the patch to the desired shape.
- Apply the Peel-and-Stick Backing: Peel off the backing from the peel-and-stick sheet and attach it to the sticky side of the patch.
- Trim and Shape the Patch: Trim the patch to the shape you want for a clean, professional finish.
- Iron Your Patch: Now your custom patch is ready to be iron on the patch! Simply follow the steps for applying an iron-on patch to make sure it stays securely in place.
C. Using Inkjet Transfer Paper
The inkjet transfer paper method is a simple and beginner-friendly way to create custom patches. With just a few steps, you can easily transfer your artwork onto patch fabric using an inkjet printer. Here's how:
- Choose or Create Your Design: Start by selecting or designing your patch artwork. If you're looking for something unique, consider working with an illustrator or graphic designer to bring your vision to life.
- Flip Your Design: Before printing, flip your design horizontally to ensure it appears upright when transferred onto the fabric. This simple step will prevent your patch from having a mirror image.
- Outline Your Design: Draw a black outline around your design. The black lines will be easy to see on the fabric, making it easier to cut and apply the patch
- Choose a patch size: Pick the size of your patch and adjust the image size accordingly. This will ensure a perfect fit for your desired patch dimensions.
- Print Your Design: Print your design onto the transfer sheet using an inkjet printer. Make sure you use high-quality paper to ensure crisp, clear results.
- Cut Your Design: Use a cutting machine for precise edges or carefully cut the design out by hand for a clean look.
- Apply the Transfer: Place the transfer sheet onto your iron-on patch backing, ensuring it's properly aligned.
- Heat It Up: Use a heat press or iron to apply firm pressure and heat, transferring the design onto the fabric.
- Peel Off the Transfer Sheet: Carefully peel away the transfer sheet to reveal your custom patch design.
- Trim Your Patch: Use scissors to cut around the patch design, giving it a clean, professional finish..
Final Thoughts
Whether you’re designing custom patches for your girl scout uniforms adding a personal touch to your wardrobe, or creating unique gifts, custom iron-on patches are a fantastic way to express your style. With the helpful tips we’ve shared, you now have everything you need to create your own custom patches with ease. Don’t have the time or supplies to make your own? No worries! At THE/STUDIO, our team of expert designers can turn your ideas into reality. We offer a wide range of materials, backing options, and designs, so the only limit is your imagination. Reach out to us today, and let us create the perfect custom iron-on patches for you, ready to apply with ease.